How to use a vacuum tester
- Read time: 3 minutes
- Date: 28 Feb 2020
- Sheeting & Cladding
The seal tester is for use wherever EPDM washered fasteners are installed and will highlight potential water ingress around incorrectly installed or damaged fasteners. Note IMPACT DRIVERS and HIGH speed screw guns must not be used to install any self drilling roofing and cladding fasteners as this will result in over driven and damaged fasteners during installation. See the NFRC guidance note:GN01 Self drilling fasteners 2019.
Contents check
The test kit comprises:
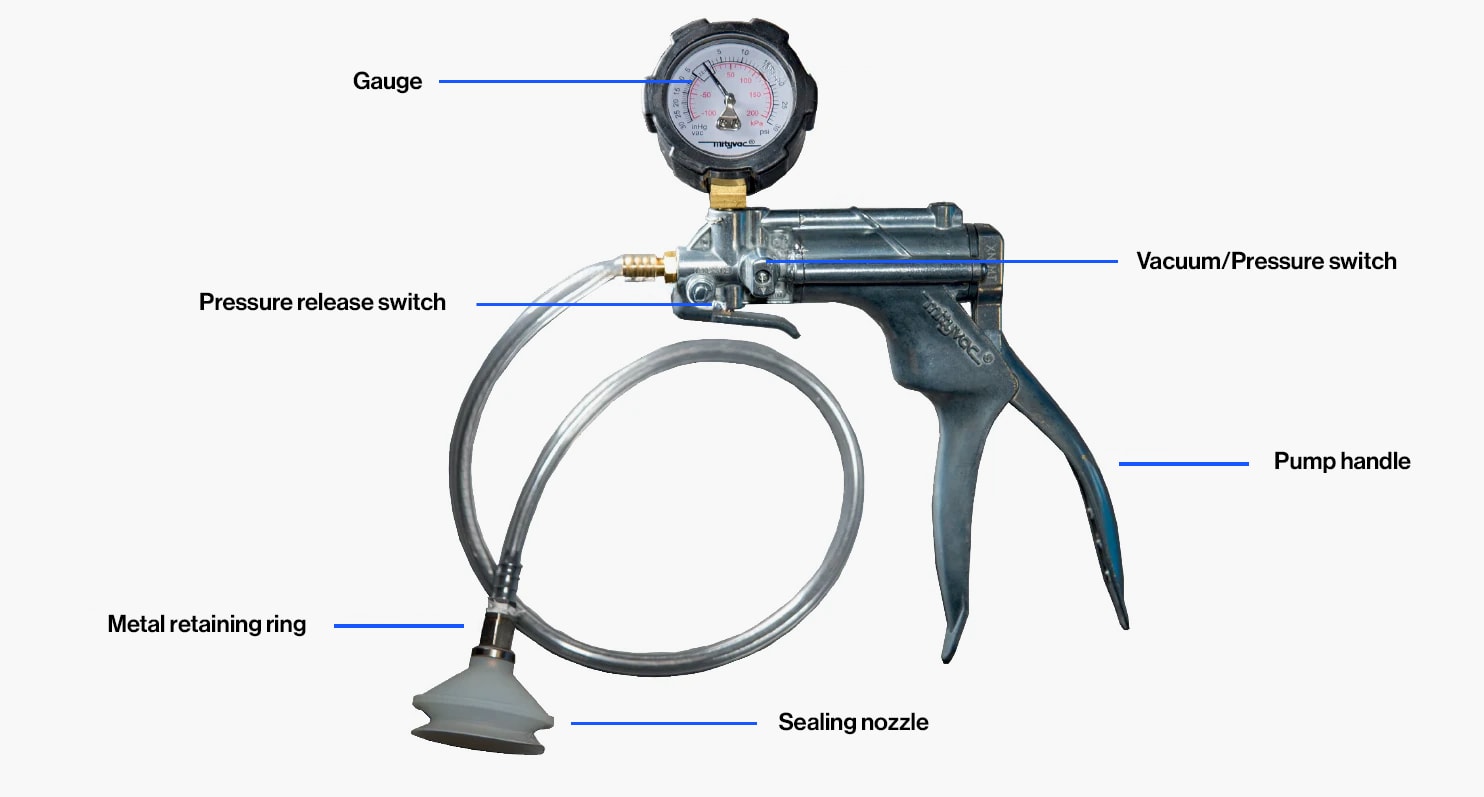
Main hand operated pump unit complete with calibrated vacuum gauge
Rubber adapter sealing nozzles to suit 5,19 & 29mm Ø washers
Two lengths of flexible clear PVC tubing
Carry case
Assembly of hand operated tester and check prior to test
Select one of the 3 rubber adapter sealing nozzles which provide the best fitting over the head of the fastener to be tested. The nozzle must be able to sit squarely over the fastener head and provide 360° contact with the sheet surface during any test
Slide the metal retaining ring off the rubber neck. Push fit the base of the selected nozzle onto the connector on the applicator tool. Replace the metal retaining ring
Ensure the selector switch is on VACUUM
To test all connections are correct and that the vacuum gauge registers, push the rubber sealing nozzle onto any smooth flat non-porous surface and operate the pump handle twice. The vacuum gauge should show and hold a reading in the inner scale of about -50kPa. Either pulling away the sealing nozzle from the smooth surface, or twisting the selector switch to pressure will return the gauge to zero
If a reading was registered you are now ready to vacuum seal test the selected fastener
Test Method
Ensure the HAND PUMP selector switch is on VACUUM
The area around the washer head must be wiped free from dust or dirt. This will ensure the sealing nozzle will fit flush to the sheet surface and prevents foreign bodies being sucked into the test equipment. Applying moisture to the sheet/nozzle will help in achieving a seal
Hold the applicator tool and position the sealing nozzle over the selected fastener head. Push firmly to achieve a seal and pump the handle
After 2 or 3 full pumps the gauge should register and hold a reading more than -50kPa. If the vacuum falls to zero within 5 seconds it should be regarded as a failure. Note a gradual decline to zero in excess of 5 seconds would not indicate water ingress.
In the event of rapid failure, that is no vacuum reading can be registered the test should be repeated. If a second failure occurs the fastener should be investigated, tightened or replaced as necessary and the test repeated
Note: It is important to note that this test equipment is creating and recording a vacuum. The vacuum test is a very stringent method of establishing the presence of air leaks and when applied to water, with its increased density and viscosity, a small air leak would not indicate a potential water leakage.
If you have any questions relating to this test equipment call Fixfast 0800 314 7616 or email tech@fixfast.com


