How to use HandyDek
- Read time: 3 minutes
- Date: 09 Jan 2020
- Flat Roofing
PLEASE READ CAREFULLY PRIOR TO INSTALLATION.
IF YOU HAVE ANY QUESTIONS PLEASE CONTACT 0845 450 7483
Storage
Canisters must be stored at between 10°C and 35°C prior to use.
Do not store directly on concrete floor. Store on a pallet or something similar. Un-opened canisters have a shelf life of 12 months.
NOTE: Do not expose to excessive heat or direct flame.
Pre-Application checks
HandyDek can be applied in temperatures above 5°C.
Materials to be bonded should be dry and free from dust and oil/grease.
If there is any darkening of the substrate to indicate a significant moisture content, this may affect satisfactory adherence of this insulation adhesive.
Materials Checklist
HANDYDEK - 750ml Adhesive Aerosol
FOAM APPLICATOR GUN - Standard Applicator Gun
FOAM APPLICATOR GUN-600 - Long Reach Applicator Gun
GUN CLEANER - Cleaner
Gloves - (supplied separately)
Safety Glasses - (supplied separately)
Preparation
01. Screw the HandyDek aerosol to the FOAM APPLICATOR GUN thread and fully tighten
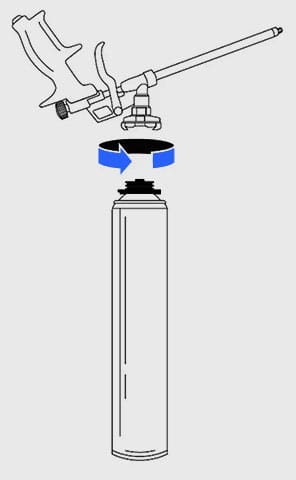
02. On initial use, and if the product has been standing for more than 12 hours, shake the aerosol for 30 seconds.
03. Turn on the valve on the back of the FOAM APPLICATOR GUN.
Application
04. To apply the adhesive, invert the aerosol and pull the trigger.
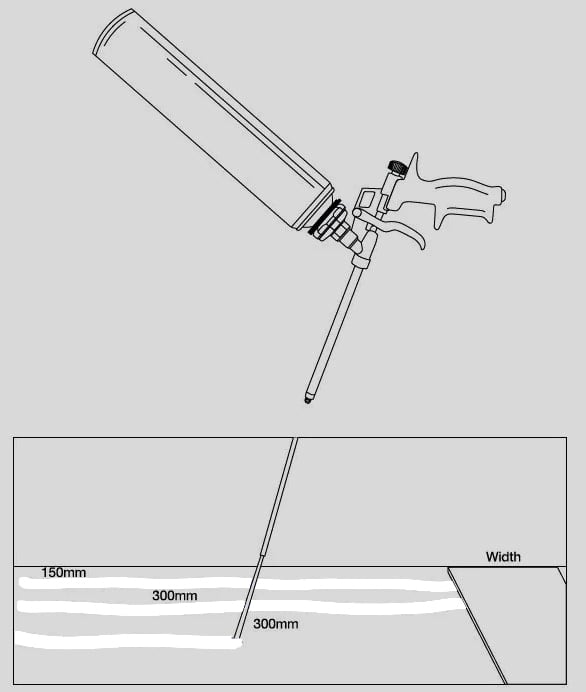
Apply adhesive in beads 20 - 30mm wide from a standing position, keeping the tip of the gun at least 25mm from the deck.
(Do not drag the end of the gun on the ground as this will damage the tip).
05. Adhesive should be applied to the deck 150mm in from each edge of the insulation board and beads should run across the width of the board.
NOTE: The maximum insulation board size that can be adhered is 1200 x 1200mm.
06. Apply beads of adhesive at 300mm centres between the edge beads for boards in the field area (For perimeter and high wind load areas the number of beads may need to be increased by reducing the bead centres).
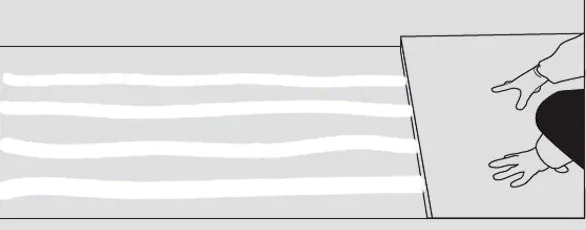
07. After applying the adhesive wait for 2 minutes before laying the insulation boards.
NOTE: Adhesive will not give a sufficient bond if a skin has formed.
08. Apply pressure to boards by hand to make sure the boards are level and the joints are even. Adhesive does not rise again once boards have been placed and pressure applied so you can place the next board immediately.
Initial bond will be achieved after approx. 30 minutes and boards are safe to walk on.
Final cure will be achieved in 24 hours.
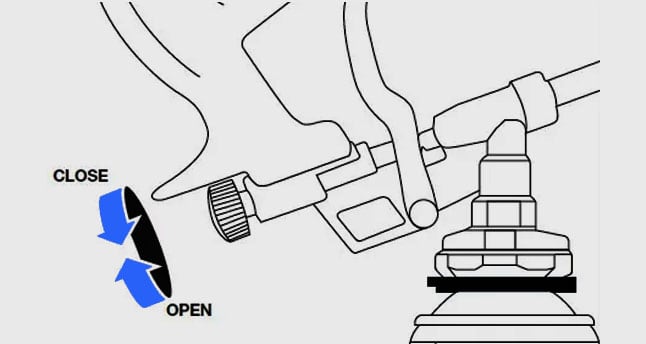
09. Once you have finished applying adhesive turn off the gun using the adjustment screw (clockwise).
NOTE: It is advisable to turn off the gun even if you are only stopping for a short break.
Changing to a new aerosol
10. When you are nearing the end of a canister you will get a spluttering spray. At this stage you should expel as much as possible and then change to a new aerosol.
11. Turn off the Gun valve (clockwise). Unscrew the aerosol and screw a new one on as detailed in point 01 – 03 above.
Cleaning the FOAM GUN
Screw the GUN CLEANER aerosol to the FOAM APPLICATOR GUN thread and fully tighten.
Pull the trigger on the Gun until the adhesive has cleared through the gun and the cleaner is coming through.
The GUN CLEANER also has a nozzle which can be attached and used to clean the tip of the FOAM GUN.


